The single most important thing anyone can do in preparation for any type of disaster is to be armed. That's right, keep one up in the chamber, all of your mags loaded, and a small supply of extra ammo on hand and easily accessible to anyone in your house or group that is qualified to use the weaponry. Notice, I said qualified to use the weaponry. If you are a live by yourself, then you could keep a gun in every drawer of the house, as long as you aren't expecting guests anytime soon. If you have young children that have not used a gun then you will have to take a different approach so as to keep everyone in the house safe. I know children can and I believe they should be taught how to properly handle a weapon, whether it be a gun, machete, or a grenade, if its in your house and you expect that they might have to use it at some point then they need to know how to use it. However, this is a different subject for another day as every parent will have their own ideas on teaching gun handling and safety to their kids so I will not go into too much detail here. Different people will have different perspectives on how to raise children around guns and I am not one to tell you how it should be done, but I will say, be smart and be safe.
During any disaster you should be armed. Some of you reading this might only own one firearm and that is fine, you need to learn to use it well, field strip it for cleaning and have the ability to assemble it again in the dark or blind folded if necessary. Some reading this might have the luxury to pick and choose the weapon based on the circumstances and task at hand. Either way, your gun needs to be tailored for the environment in which you will be using it to defend yourself or to put food on your plate. For the rest of the month, all of the posts about Emergency Preparedness and the Zombie Apocalypse, will be tailored for a worst case scenario, which is what everyone should prepare for even if the worst thing you experience is a small tornado that runs through the adjacent city or a hurricane that makes landfall 200 miles from your home. It could be a hell of a lot worse than that.
State of the Union
Here is the disaster that we will prepare for - a global disaster that causes widespread power outages, mass looting and rioting, downed cellular/tv/radio towers, and mass hysteria in general. All governments declared military rule a couple months back, but the few remaining troops have not heard from any of the countries leaders in a few weeks and are now taking the law into their own hands. Most fire and police departments have disbanded and their offices have been looted. Some of the nations jails have been broken open while other, max-security prisons are running on backup power with a 24 hour lockdown in place, all inmates are locked in cells, and all prison guards have fled the premises. No stores are open for business, Wal-Marts, gas stations, and all other stores are constantly being looted, people are entering at all hours and taking whatever they need. Pharmacies have been closed and most have been looted, those needing medications have died or will die if they do not have access to extra meds. Hospitals have been turned into shelters and field triage centers, some have the luxury of having a few National Guardsmen, with what little supplies they have left, stationed on the premises. Since most of the country has no power, gas stations can't pump gas, traffic lights are out, no one drives the streets due to the millions of cars stopped in the roads. Some of America's houses still have running water, but it is starting to turn brown - the only one's with clean, running water live in smaller towns close to a lake or have access to their own well water. All communications have been compromised, cell phones do not get signal, Televisions and radios receive one broadcast if they are even capable of picking it up, it is an emergency signal sent out by the government, it varies based on where you live, some people are being told to evacuate, some are being told to stay indoors. Many of America's major cities have been destroyed, and cities that do stand are not functioning and in decay, as city services and maintence are non-exsistent and garbage continues to litter the environment. American's have not heard from out President or anyone from the White House in a couple of months, the last we knew he took to the sky in Air Force 1 minutes before DC was destroyed. It is estimated that less than 100 million Americans are still alive, hundreds if not thousands die each day many because of starvation the rest due to the lack of medical services and clean water. Before the disaster began the United States population was 311.5 million strong.
What has been described is the State of the Union that we will be preparing for this month. It will not be easy to survive these hard times, it will take strong people with strong minds and people with different skill sets will have to band together in order to survive and start to rebuild. Keep the above in mind as you complete the projects and read the different posts this month. Good luck and God Bless!
Project 1 - Firearm Finishing
As you can see it is a mess, and those that are armed are the ones that are surviving. Since I will be on foot and walking to meet my family who live 700 miles away, my weaponry and supplies have been customized for this journey. Everything of mine has to be packed in waterproof storage so that it does not ruin in the event of rain. I have decided that the majority of my travels will be done in wooded areas, through National and State Forests, and Mountain ranges. I have customized my rifle for this environment by applying a waterproof, rustproof, scratchproof, and chemical resistant, bake-on coating of
Coyote Tan Alumahyde II available from my favorite supplier,
Brownells. Due to the nature of the disaster, gun parts will be hard to find, so I have to make sure all the internals of the rifle can survive long periods of extended fire and severe abuse from the environment without wearing out or breaking. I had the bolt carrier group and hammer
Exo Coated by
FailZero. Exo Coat is harder than chrome and self lubricating, so the rifle will never have to be oiled and the internals will last for more than 950,000 rounds of firing!
Disassembly and Cleaning
The gun must be completely disassembled and cleaned. I used Gun Scrubber to degrease everything and remove carbon deposits. You might find this pointless if you clean your guns as well as I after every shooting, but trust me, if the firearm has been function checked there will be carbon somewhere, plus all that oil you applied after cleaning it has to come off. Anywhere oil and carbon are left, the paint will flake right off instead of setting into the pores of the metal (not good). After everything had been degreased, I bagged up all the internals so that I wouldn't loose any of those little springs and pins necessary for the gun to fire. I then took only the main pieces of the gun that I wanted to apply the coating to and put them in the dishwasher. Your wife or girlfriend may object to this at first but it is completely harmless and will make that gun sparkle like her champagne flutes! Use both racks, heavy parts on bottom, lighter weight stuff on top. I placed the quad rail, disassembled upper and lower receivers, disassembled stock, and pistol grip into the washer. Add a little powder cascade or whatever other fine dishwashing detergent is used at your house and run the dishwasher on a pot and pan cycle! For an added cleaning effort, I sprayed Shout laundry stain remover on every part after it was placed into the dishwasher and before I started the wash cycle, this helps to ensure all the grease and dust particles come off. You do not want to let the gun stay in the dishwasher for the full length of the washers cycle as the heat dry can cause rust to form in a matter of minutes that would normally take a couple of years! I stopped the dishwasher a few minutes after the dry cycle had started so that the parts were soaked with water. I gave everything a final rinse in the sink and then hand dried everything with a kitchen towel.
Metal Prep
I purchased a brand new stripped lower for this project. I relocated from
Northwest Arkansas, where I grew up, to
Houston, Texas two years ago and found a new favorite gun store,
SOG Armory, located off E Beltway South just south of 59 (take the Airport Blvd exit).
SOG manufactures their own
lowers and
AR-15s here in
Houston. No matter where on Earth guns are manufactured, they must be stamped with the city they hail from. So, all of
SOG's lowers are stamped
Houston, TX. Check out these two photos, you'll see the
SOG logo engraved in the first and a close up of the
Houston, TX engraving in the second pic. As you can see,
SOG manufactures these
lowers to standard
US Military specifications which adhere to NATO specs as well, so one can conclude that these
lowers, made in
Houston, are interchangeable with any
AR-15/
M16/
M4 and it's parts no matter where on this planet they were made, as long as they too were made to
Mil-Spec standards (which most are - 99.998% being most).
 |
| This is just a close up of the manufactured location engravings on a SOG lower - H-TOWN! | | | |
|
Moving on to the details of Metal Prep so that you can begin coating your gun with the appropriate finish for the environment you will be fighting to survive, you will need to gather you sandpapers! I had a collection of Wet/Dry Sandpaper on hand for metal and wood from some Automotive fiberglass and Bondo projects I had done years back, I found that the higher grits available on Wet Auto Sandpapers were ideal for this project. You can pick these up your local auto parts store and I did acquire some 800 grit from Home Depot in the paint department. The following grits are necessary for this step: 220, 400, 600, 800, 1000 or 1200. To save some cash you can substitute the 600 grit for 800 or vis-a-versa but to achieve the ideal finish use all grits in the order listed above. These automotive sandpapers are typically black in color.
The lower the grit the more material removed, the surface of a brand new lower that was cleaned along with all the other parts only needs to be sanded lightly with the highest grit paper you have on hand. I used 1200. This did not remove the
Mil-Spec black finish it merely softened the surface for me. Be sure to wipe the lower off thoroughly, use air duster or an air compressor to ensure there is no dust left as this will cause the finish to bubble. The lower is done once clean, set it aside as you will need to coat all parts at once so as to ensure an even and matching color across all.
My quad rail needed the most sanding as it was a used part and has seen some action it is day. I started removing the
Mil-Spec black finish with the 220 grit paper went over all edges to ensure that any blemishes in the metal, from attaching accessories to the rail, were smoothed out. DO NOT REMOVE THE ENTIRE FINISH!! You just want to scuff up the original finish so that the new finish has something to stick to, you can remove the original finish and expose the bare aluminum but I do not recommend this as it can rust much quicker. Plus having a
Mil-Spec coating under your new finish just makes the guns coating that much more impermeable to the elements. Continue to move up in grits until there are no deep scratches, the finish is even and grey in color from scuffing the black finish up. The edges and grooves of the rail should be smooth. I forgot to mention earlier but will now, if your rail has white T markings on it, you do not want to remove these so just use higher grit papers in these grooves (600/800/1000/1200 are adequate). These markings are laser engraved into the metal and then a paint is applied to give them the white appearance. It may not appear to have depth but these markings are engraved in the metal so there is some depth to them, you DO NOT want to sand the depth out of these, you'll see why once the project is done. The rail is done and can be set aside.
Using the same techniques as described above you will want to do every metal part that is going to coated with the new finish. Plastic parts, like the pistol grip do not need to be sanded unless they are smooth in texture then the sanding will help roughen up the plastic so that the new finish will stick better. The butt stock should be sanded with a high grit paper just to remove any protective coating applied and to allow the paint to stick easier. I completely disassembled my
Magpul Buttstock taking all the screws out. This allowed me to paint what I wanted so that when I put it back together all the screws were still black and so was the rubber buttpad, it gave it a really cool look!
Applying Some Color
On to the finish. Applying the paint can be difficult especially since the entire part being coated must be coated at once, so you can conclude that the part can not be sitting on any one side as you won't want to touch the part until it has completely cured. The best way I found to paint the parts was by turning the garage into a paint booth. I used invisble thread (fishing line with a really low test, so that it is thinner, makes a great substitue) to suspend some parts from the garage rafters to where they were at eye level. Most every part on a firearm will have some hole that you can feed the line through. On an AR you can use the takedown pin holes or screw holes on the rails. I drove long skinny nails into some of the studs and placed the pistol grip on one and hung smaller pieces of the quad rail on others. I even made some stands out of wood to place parts on so that they could be moved into the sunlight to cure. Depending on what type of coating you will be using, there should be instructions on the finish instructing you on how to apply it. Since I used Brownells Aluma-hyde II I will be using it as an example. It took two cans of Coyote Tan Aluma-hyde II to complete one AR-15. I had purchased a can of clear but it turned the Tan color to an Olive Green so I discontinued its use, sanded the part I applied it to and refinished with the Tan. Don't make the same mistake I did.


As you can see by the pics above, instructions are posted on the back of the aerosol cans. I also purchased more spray nozzles and was very glad I did as Gasoline, Paint Thinner, and Mineral Spirits will not remove this finish from the nozzles, since it is a very thick coating (probably due to its scratch resistant properties) it clogs nozzles quickly. Having extras on hand is a must
That is everything you need to know to start and finish this project. Now check out pics I took as I did this project. FYI - Click on any picture in this post and anyother post to see the pic in full resolution and at its highest quality. You may save any picture in this post to your computer, if you would like to use them in anyway for profit, please contact me first so that I can be made aware of what pictures you will be using. Thanks!
 |
| I removed the plug on the grip before painting so that it would have the bi-tone effect |
 |
| Notice the rubber buttpad has been removed |
 |
| I did not want the buttpad painted so that I could achieve the bi-tone effect here as well |
 |
| Same as the pistol grip, I did not paint the buffer tube. |
 |
| When re-finishing a firearm it provides an excellent opportunity to change out parts for upgraded ones as you have the entire gun disassembled. I purchased this Tactical Charging Handle Lever from SOG Armory for about $8 USD. It was a PITA to install, I chipped the finish on the Charging Handle and had to refinish it entirely. Lesson learned - don't attempt reassembly until the entire finish has completely cured. |
 |
| The finished product, completely reassembled. The color, Coyote Tan, was exactly what I was trying to achieve. I also wanted the bi-tone coloring black/coyote tan and it turned out exactly how pictured in my mind, if not better. Guntastic! |
 |
| Angled view of the new finish on AR-15 |
|
 |
| Close up of Lower and Upper Receiver equipped with Mil-Spec Black finished parts |
 |
| Top: Complete Billet AR-15 w/ 16" Diamond Fluted Barrel in Mil-Spec Black Finish. Bottom: Mil-Spec 16" M4 Contour Barreled AR-15 in Aluma-hyde II Coyote Tan Finish. Both guns features KNS Non-Rotating Pins and JP Enterprises Lightweight Springs, creating a crisp and clean trigger break. |
|
 |
| Notice the top AR-15 is built on a Side Charging Upper and equipped with a Young Manufacturing Chromed Side Charging Bolt Carrier Group. The Tan AR-15 on the bottom is equipped with FailZero's Exo Coated Bolt Carrier Group which is self lubricating eliminating the need for any oil or lubricants, EVER and the Exo Coating is 10x harder than Chrome so it exhibits almost no wear even with long periods of sustained full-auto firing. |
|
|
 |
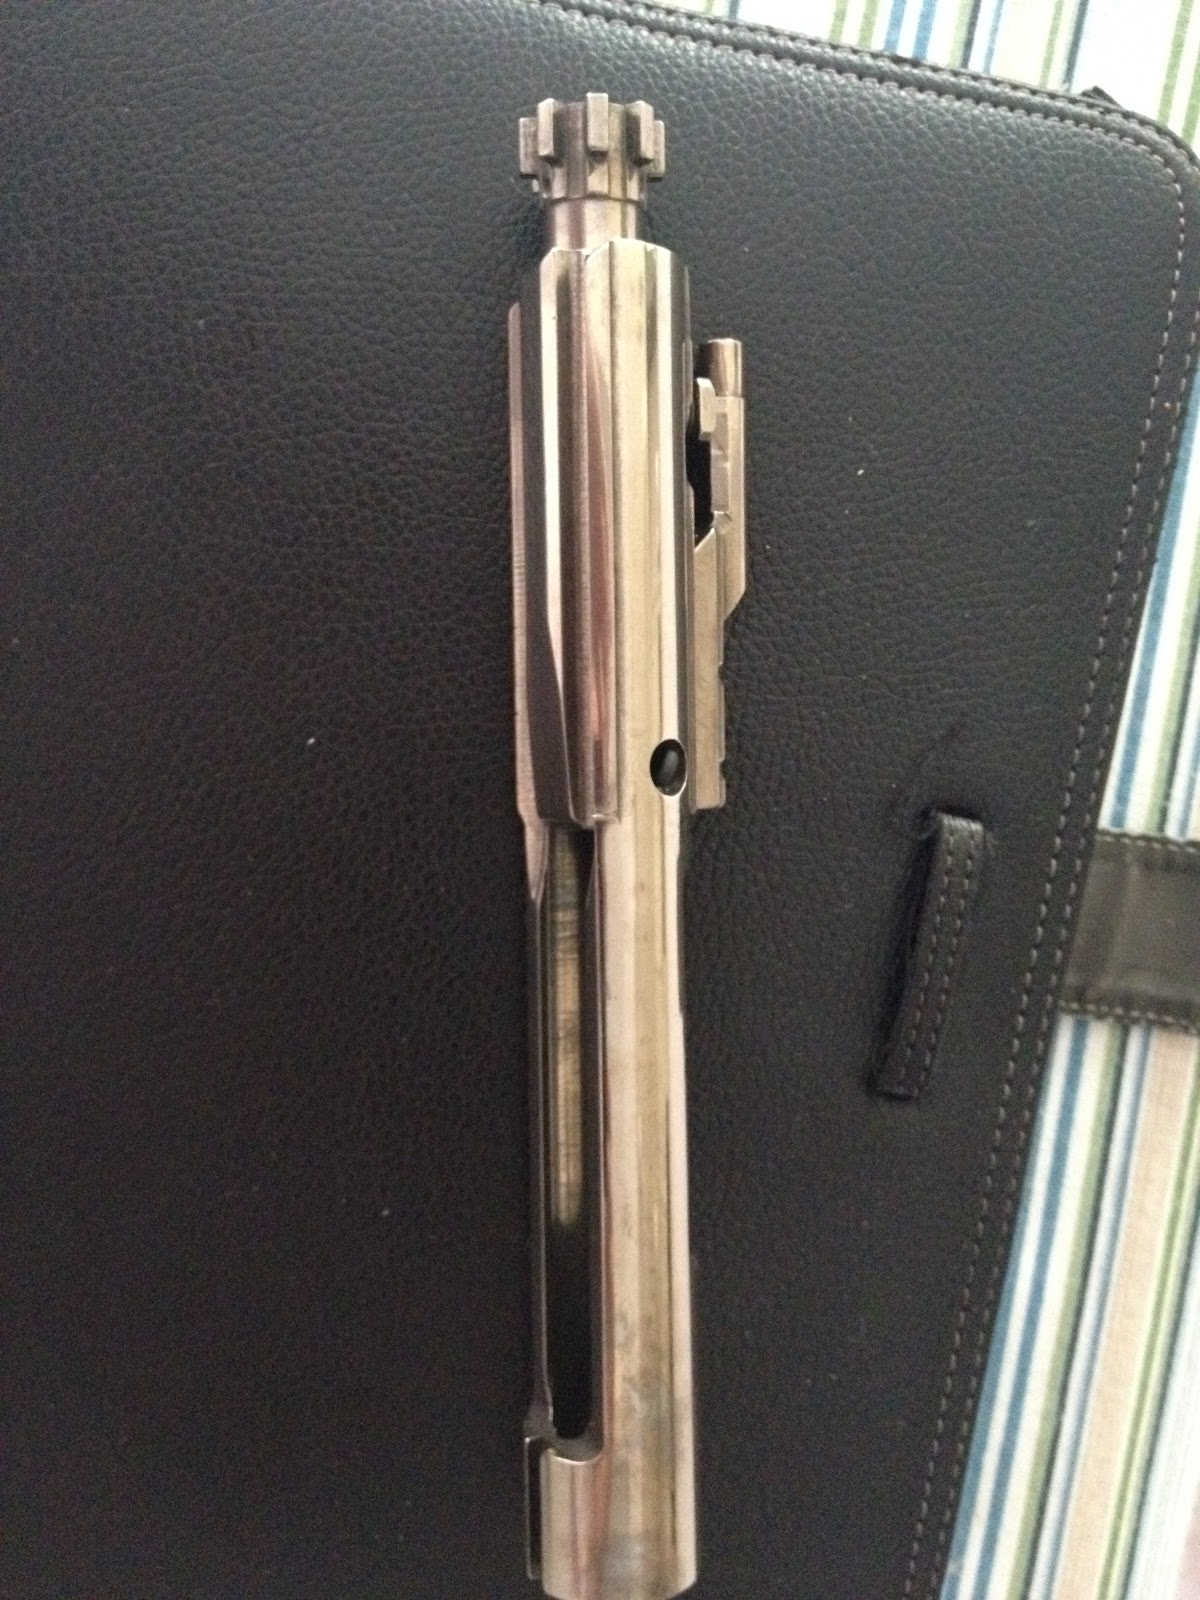
| FailZero's Exo Coated Bolt Carrier Group |
 |
| Another view of the FZ Exo Coated BCG |


Looks great man.
ReplyDeleteI wanted to thank you for this excellent read!! I definitely loved every little bit of it. I have you bookmarked your site to check out the new stuff you post. https://thesurvivallife.com/firearm
ReplyDeleteYes, you could keep a gun in every drawer of the house!
ReplyDeleteadventurefootstep.com